Apache JMeter, a powerful open-source tool, offers distributed testing features that allow users to spread the test load across multiple machines, creating a more realistic and scalable testing scenario.
Distributed testing is vital for performance testers who need to simulate thousands or even millions of virtual users across different geographic locations, network conditions, and devices.
This guide will cover everything from basic setup to advanced configurations, ensuring both beginners and advanced users can execute distributed testing with ease.
What is Distributed Testing in JMeter?
Distributed testing involves using multiple machines to simulate a higher number of users than a single machine could handle.
This is achieved through a master-slave setup. The master machine orchestrates and coordinates the test execution, while the slave machines are responsible for generating the actual load.
The core advantage of distributed testing is that it allows testers to simulate real-world scenarios more accurately by distributing the load, ensuring that the application under test (AUT) behaves as expected under various loads and conditions.
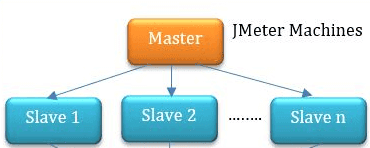
How JMeter’s Master-Slave Architecture Works
- Master: The machine that coordinates the test. It sends the test plan to the slave machines and aggregates the results.
- Slaves: These machines execute the test plan and generate the load as instructed by the master. They report the results back to the master.
This architecture provides a scalable way to simulate heavy loads without overburdening a single machine, thereby reducing the risk of test results being affected by resource bottlenecks.
Setting Up JMeter for Distributed Testing: A Step-by-Step Guide
Requirements:
- JMeter Installed: Ensure that JMeter is installed on all machines (master and slaves). You can download the latest version of JMeter here.
- Java: All machines should have the same version of Java installed.
- Network Connectivity: The master and slave machines must be able to communicate over the network (ensure firewall and network configurations allow communication on the default port 1099, or another if specified).
Step 1: Prepare the Master Machine
- Install JMeter: Install JMeter on the master machine. Ensure that the version matches the versions installed on all slave machines to avoid compatibility issues.
- Navigate to the JMeter Properties File: Open the
jmeter.propertiesfile located in the JMeter installation directory (/binfolder). - Edit the Properties:
- Find the line that specifies
remote_hosts=127.0.0.1. - Replace
127.0.0.1with the IP addresses of your slave machines, separated by commas. For example: remote_hosts=192.168.1.101,192.168.1.102- This tells JMeter where to look for the slave machines.
- Find the line that specifies
Step 2: Prepare the Slave Machines
- Install JMeter: Just as with the master, ensure JMeter is installed on all slave machines.
- Start the JMeter Server:
- On each slave machine, navigate to the JMeter installation directory.
- Run the following command to start the JMeter server
- ./jmeter-server
- On Windows, use the following: jmeter-server.bat
- Make sure the server is running and the slave machines are ready to accept test execution instructions from the master.
Step 3: Launch JMeter on the Master Machine
- Open JMeter: Start JMeter in GUI mode or in non-GUI mode for larger test plans.
- Remote Start:
- To start a distributed test, go to the Run menu and select Remote Start.
- Alternatively, you can run JMeter from the command line for non-GUI mode (recommended for heavy tests):
- ./jmeter -n -t [test plan file] -r
- The
-rflag tells JMeter to run the test plan on all configured remote hosts (slave machines).
Step 4: Configure the Test Plan for Distributed Execution
When creating your test plan, ensure that it is designed to take advantage of distributed execution. Here are some key considerations:
- Thread Groups: Set up appropriate thread groups to represent virtual users. Ensure the number of threads (users) you assign can be effectively handled by the combined resources of the master and slave machines.
- Data Set: If your test relies on a CSV Data Set Config, ensure that each slave machine has access to the same data source, or distribute the data evenly across the slaves.
- Listeners: Keep listeners to a minimum to avoid performance overhead. Instead of using graphical listeners (like View Results Tree), use aggregate reports or save results to a file for post-test analysis.
Step 5: Execute the Distributed Test
- Start Test Execution: Initiate the test execution from the master machine either through the GUI or command line.
- Monitor Execution: Monitor the test in real-time through the Remote Start option or using listeners like Summary Report or Aggregate Report.
- Collect and Analyze Results: After the test execution completes, gather the results from all slaves, which are automatically reported back to the master machine for aggregation.
Advanced Configuration Tips
- Using SSH Tunnels: If your slave machines are on a different network or behind a firewall, you can use SSH tunneling to allow the master to communicate with them securely.
- Custom Ports: JMeter uses port 1099 by default for RMI (Remote Method Invocation). If this port is blocked or unavailable, you can change the port by editing the
server.rmi.portproperty in thejmeter.propertiesfile on both the master and slave machines:
server.rmi.port=50000Multiple Masters: For very large-scale testing, you can even configure multiple master machines to coordinate subsets of the slave machines, further distributing the load.
Advantages and Disadvantages of JMeter distributed testing:
Advantages of Distributed Testing in JMeter:
- Scalability:
- It allows the simulation of larger loads by distributing tests across multiple machines, reflecting real-world scenarios, and accommodating higher user volumes.
- Efficiency and Reduced Execution Time:
- With parallel execution on multiple nodes, test execution time is reduced significantly, enabling faster feedback and quicker identification of performance issues.
- Resource Utilization:
- Distributing the load across machines optimizes resource utilization, leveraging combined computing power, memory, and network capabilities for comprehensive testing.
- Flexibility and Adaptability:
- Distributed testing offers flexibility to add or remove nodes dynamically, adapting to changing testing requirements and accommodating different infrastructure setups.
- Realistic Load Simulation:
- It allows for more accurate simulations of user behaviors and system responses by mimicking diverse usage scenarios across various locations and devices.
Disadvantages of Distributed Testing:
- Complex Setup and Configuration:
- Setting up a distributed testing environment requires the configuration of multiple machines, network settings, and synchronization, which can be complex and time-consuming.
- Increased Maintenance Overhead:
- Managing multiple nodes, ensuring their synchronization, and maintaining consistent configurations across machines can add to the maintenance workload.
- Network Dependencies:
- Reliance on stable and high-speed network connectivity between master and slave nodes is crucial. Network failures or latency issues can affect test results and execution.
- Cost Consideration:
- While utilizing existing resources is cost-efficient, scaling to a higher number of nodes may require additional hardware, leading to increased infrastructure costs.
- Synchronization and Result Collection:
- Coordinating and collecting results from multiple nodes for comprehensive analysis might pose challenges, especially in aggregating and interpreting data from diverse sources.
Example: Distributed Load Testing Scenario
Let’s say you’re testing an e-commerce website and need to simulate 10,000 concurrent users browsing and purchasing items. You could set up a distributed testing environment with the following configuration:
- Master: 1 machine to orchestrate the test.
- Slaves: 4 machines, each configured to simulate 2,500 users.
- Test Plan: The test plan could include actions such as browsing product pages, adding items to the cart, and completing a purchase.
By distributing the load across the 4 slave machines, you simulate a realistic scenario where 10,000 users interact with the site simultaneously, providing a better understanding of how the application performs under heavy load.
Conclusion
Setting up distributed testing in JMeter is a powerful technique to scale your load testing efforts and achieve more accurate, real-world results. While it may involve some initial setup and configuration, the scalability, resource optimization, and realistic load simulation make it an essential skill for performance testers.
With the proper configuration, you can simulate thousands of users across different locations and networks, providing insights into your application’s performance under heavy load.
For more in-depth guidance and advanced configurations, refer to JMeter documentation.
Read More: Best practices in JMeter